Showing posts with label Search. Show all posts

Sunday, September 28, 2014

Configure Crawl Sources in sharepoint 2013

How to start a full crawl in Central Administration
Before you can start a full crawl in Central Administration, you have to specify which content source should be crawled. When you run a full crawl, all content in the content source is crawled even if that content has already been added to the search index.
For this scenario, we'll crawl the Local SharePoint sites content source.
  1. Go to Central Administration --> Manage service applications --> Search Service Application -- > Content Sources.
  2. On the Manage Content Sources page, hover over the Local SharePoint sites content source, and select Start Full Crawl from the menu.

The status of the crawl is shown in the Status column.
  1. Refresh this page until you see that the value in the Status column is Idle.
    This means that the crawl has finished.

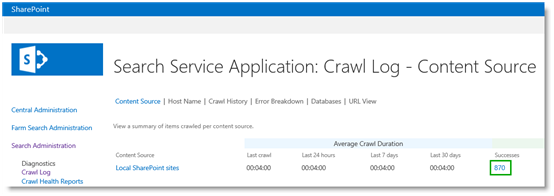
  1. Optionally, you can verify that your items have been added to the search index by clicking Crawl Log.
    In our scenario, we now have 870 items in the search index, which is approximately the same amount of products we have in the Products list.

How to enable continuous crawls in Central Administration
You can only start a full crawl manually. Nobody wants the hassle of having to manually start a crawl every time a change is made to their catalog content, as this is neither an efficient nor practical way to work. So, to avoid this overhead, you can simply enable a continuous crawl of your content source that contains the catalog.
Continuous crawls start automatically at set intervals. Any changes that have been made to the catalog since the previous crawl, are picked up by the crawler and added to the search index.
To enable continuous crawls:
  1. Go to Central Administration --> Manage service applications --> Search Service Application --> Content Sources.
  2. On the Manage Content Sources page, click Your content source for which you want to enable continuous crawl, in our scenario case, this is Local SharePoint sites.
  3. Select the option Enable Continuous Crawls.

How to set continuous crawl interval
The default interval for continuous crawls is 15 minutes. You can set shorter intervals by using PowerShell. The code snippet below sets the continuous crawl interval to 1 minute.
$ssa = Get-SPEnterpriseSearchServiceApplication
$ssa.SetProperty("ContinuousCrawlInterval", 1)
So, by enabling continuous crawls, you can avoid a lot of frustration from content managers as they no longer have to wait for Search service application administrators to start a crawl for them. However, for some catalog changes, for example, enabling managed properties as refiners, continuous crawls are not sufficient, and you will need to do a full reindexing of the catalog content. But not to worry. Content managers have no reason for concern, because there is a way for them to initiate a full reindexing of the catalog.
How to initiate a reindexing of the catalog
To mark a catalog for reindexing, here's what to do:
  1. On your catalog (in our case the Products list in the Product Catalog Site Collection), click the LIST tab --> List Settings --> Advanced Settings.
  2. On the Advanced Settings page, click Reindex List.

How to view crawl status and schedule for a catalog
You can view the crawl status and schedule for an individual catalog. To do this:
  1. On your catalog (in our case the Products list in the Product Catalog Site Collection), click the LIST tab --> List Settings --> Catalog Settings.
  2. On the Catalog Settings page, you can see when the catalog was last crawled, and what crawls are scheduled to run when.
    In our case, we can see that the catalog was last crawled on 3/4/2013 at 5:30:17 AM, and that continuous crawls are scheduled to run every 15 minutes.

So, all in all, content managers can be happy because their content is added to the search index at short intervals, and Search service application administrators can be happy because they are no longer bothered by content managers constantly asking them to start a crawl.

Configure Crawl Rules in Sharepoint 2013

To create or edit a crawl rule
      1. Verify that the user account that is performing this procedure is an administrator for the Search service application.
      2. In Central Administration, in the Application Management section, click Manage Service Applications.
      3. On the Manage Service Applications page, in the list of service applications, click the Search service application.
      4. On the Search Administration page, in the Crawling section, click Crawl Rules. The Manage Crawl Rules page appears.
      5. To create a new crawl rule, click New Crawl Rule. To edit an existing crawl rule, in the list of crawl rules, point to the name of the crawl rule that you want to edit, click the arrow that appears, and then click Edit.
      6. On the Add Crawl Rule page, in the Path section:
  •       In the Path box, type the path to which the crawl rule will apply. You can use standard wildcard characters in the path.
  •        To use regular expressions instead of wildcard characters, select Use regular expression syntax for matching this rule.
7. In the Crawl Configuration section, select one of the following options:
     
      I.  Exclude all items in this path. Select this option if you want to exclude all items in the specified path from crawls. If you select this option, you can refine the exclusion by selecting the following:

Exclude complex URLs (URLs that contain question marks
Select this option if you want to exclude URLs that contain parameters that use the   question mark (?) notation.

      II. Include all items in this path. Select this option if you want all items in the path to be crawled. If you select this option, you can further refine the inclusion by selecting any combination of the following:

Follow links on the URL without crawling the URL itself. Select this option if you want to crawl links contained within the URL, but not the starting URL itself.

Crawl complex URLs (URLs that contain a question mark (?)). Select this option if you want to crawl URLs that contain parameters that use the question mark (?) notation.

Crawl SharePoint content as http pages. Normally, SharePoint sites are crawled by using a special protocol. Select this option if you want SharePoint sites to be crawled as HTTP pages instead. When the content is crawled by using the HTTP protocol, item permissions are not stored.

      8. In the Specify Authentication section, perform one of the following actions:

  •     To use the default content access account, select Use the default content access account.
  •     If you want to use a different account, select Specify a different content access account and then perform the following actions:
1.  In the Account box, type the user account name that can access the paths that are defined in this crawl rule.
2.  In the Password and Confirm Password boxes, type the password for this user account.
3.  To prevent basic authentication from being used, select the Do not allow Basic Authentication check box. The server attempts to use NTLM authentication. If NTLM authentication fails, the server attempts to use basic authentication unless the Do not allow Basic Authentication check box is selected.

  •     To use a client certificate for authentication, select Specify client certificate, expand the Certificate menu, and then select a certificate.
  •     To use form credentials for authentication, select Specify form credentials, type the form URL (the location of the page that accepts credentials information) in the Form URL box, and then click Enter Credentials. When the logon prompt from the remote server opens in a new window, type the form credentials with which you want to log on. You are prompted if the logon was successful. If the logon was successful, the credentials that are required for authentication are stored on the remote site.
  •     To use cookies, select Use cookie for crawling, and then select either of the following options:
1.  Obtain cookie from a URL. Select this option to obtain a cookie from a website or server.
2.  Specify cookie for crawling. Select this option to import a cookie from your local file system or a file share. You can optionally specify error pages in the Error pages (semi-colon delimited) box.

  •     To allow anonymous access, select Anonymous access.
              Click OK.

To test a crawl rule on a URL
1.      Verify that the user account that is performing this procedure is an administrator for the Search service application.
2.      In Central Administration, in the Application Management section, click Manage Service Applications.
3.      On the Manage Service Applications page, in the list of service applications, click the Search service application.
4.      On the Search Administration page, in the Crawling section, click Crawl Rules.
5.      On the Manage Crawl Rules page, in the Type a URL and click test to find out if it matches a rule box, type the URL that you want to test.
6.      Click Test. The result of the test appears below the Type a URL and click test to find out if it matches a rule box.

To delete a crawl rule
1.      Verify that the user account that is performing this procedure is an administrator for the Search service application.
2.      In Central Administration, in the Application Management section, click Manage Service Applications.
3.      On the Manage Service Applications page, in the list of service applications, click the Search service application.
4.      On the Search Administration page, in the Crawling section, click Crawl Rules.
5.      On the Manage Crawl Rules page, in the list of crawl rules, point to the name of the crawl rule that you want to delete, click the arrow that appears, and then click Delete.
6.      Click OK to confirm that you want to delete this crawl rule.

To reorder crawl rules
1.      Verify that the user account that is performing this procedure is an administrator for the Search service application.
2.      In Central Administration, in the Application Management section, click Manage Service Applications.
3.      On the Manage Service Applications page, in the list of service applications, click the Search service application.
4.      On the Search Administration page, in the Crawling section, click Crawl Rules.

5.      On the Manage Crawl Rules page, in the list of crawl rules, in the Order column, specify the crawl rule position that you want the rule to occupy. Other values shift accordingly.

Configure Best Bets in SharePoint


SharePoint 2013 Preview transforms all your old Search Keywords or Best Bets  into Query Rules .

So let’s create a Query Rule that fires on the exact query ‘image library’ or ‘picture library’, then promotes a result for the Image Library to the top of the page.

First, we’ll go to the Query Rules management page. On your search center’s upper-right-hand corner, click the gear icon, then select Site Settings.


Next, on the Site Settings page, under the Search heading, click Query Rules. Note that you may see a Search Query Rules link under Site Collection Administration. This happens if you’re the Site Collection administrator and the search center is the site collection’s root site. Don’t click that one; those Query Rules affect every site in the site collection, and for now we want to focus only on the search center site.


Now that you’re on the Query Rules page, the first question to ask is “Where will the user be?” For example, do you want to manage Query Rules for your main Enterprise Search? Or for People Search? Or Video Search? Each search experience, out-of-the-box or custom, can have its own Query Rules.

This is what we call the query’s context. You configure Query Rules for a particular context by using that first row of dropdowns in the Query Rules management page.


To manage Query Rules for a specific search experience, use the first dropdown to pick the Result Source for that experience. We’ll go into Result Sources in another post — for now, think of them as a SharePoint 2010 Federated Location plus a Search Scope. Each search experience sends queries to a Result Source, and that source guarantees results meeting certain conditions. For instance, People Search sends queries to the Local People Results source, which only returns People results.

We want our new Query Rule to fire on the main Enterprise Search. That search experience sends queries to the Local SharePoint Results source (which includes everything SharePoint crawls except People). So choose Local SharePoint Results from the first dropdown.

Next, click Add Rule to start creating your new rule.


Having picked a context, we just need to give the rule a name, then specify its conditions and actions. In other words, say when this rule will fire, and what it will do when it does. This is very similar to creating a Search Keyword in SharePoint 2010:

    1.  Give the rule a name: Image Library.
     2.  In the Query Conditions section, leave the condition type on “Query Matches Keyword Exactly”. In the textbox, type the queries we want to match, separated by semicolons: image library; picture library.
     3. In the Actions section, since we want to promote a result to the top of the page, click Add Promoted Result. These are just like Best Bets in SharePoint 2010.


4. In the Add Promoted Result dialog, fill out the title, URL, and description.


5. Click Save in the dialog, then Save in the Add Query Rule page.
And that’s it…you’ve created a Query Rule! To try it out, go to your search center and search for ‘image library’ or ‘picture library’ (note that it can take a few seconds for the Query Rule to start working).


This Query Rule, while simple, demonstrates the high-level steps for creating all Query Rules.
  1.      Pick the context (e.g., queries sent to the Local SharePoint Results source).
  2.      Specify the conditions (e.g., fire if the query exactly matches ‘image library’ or ‘picture library’).
  3.      Specify the actions (e.g., promote a result for the Image Library).


Saturday, September 27, 2014

How to display Search Results filtered on a specific Content Source

One of the things you may wish to do if you have multiple content sources is to limit a search result to a specific Content Source. For example I have created a BCS connection to a database table containing a list of products from the sample database Adventureworks product table. When I search, I only want to see results from the products table, like below.


 The first thing we would need to do is setup a content Source. For this example, I had previously created a BCS connection to the Adventureworks product table. Now I will create a search content source to point to this BCS connection. When I create a new content source on the search administration page and select BCS Service, a list of external data sources display. In this example I selected my Adventureworks data source.


When I am done it displays here in my content source list. I will need to do a full crawl to populate the index with items.


 Next, I will want to create a Result Source.  A Result Source will allow me to create a scope, or a subset of the crawled content to only return my BCS content source data. in the snapshots below I created a result source called AWResultSource. Note that I have created this result source at the search application level. this allows me to leverage the result source from any site collection. I could also create this same kind of filter at the result page or site collection level which we will see later in this blog.


 On the new Result Source page I have chosen "Local SharePoint" and "SharePoint Search Results" and then I will select "launch Query Builder". This will bring up the page to build the actual filter. When I first go to select my property from the property filter, the content source property does not show up. I needed to select "Show all managed properties".


 Now I select the ContentSource property, choose Manual value, and enter the name of the content source I created earlier. On the right, you will get a sample of the results to make sure you are on track. If you get a nasty message about not being able to show a preview, you will need to turn on the "Search Server Webpart and properties" feature in site settings for the admin site.


The feature name:


 At this point, I have a content source to index the content, and I have a result source to filter search results for the content.

Now I will add it to a search center site. The rest of this blog is focused on modifying the search center site collection.
For your reference, go to the Site Settings page for your search center and select "Manage Result Sources". You will note that the Result Source I created above is in the list. If I had wanted to, I could have just added it here and it would be available for this site collection.


 At this point I need a page to show the filtered results with. This is the interesting part, the settings for the filter to only show the results for the content source is part of the results page. Now lets create the page. Go to the Pages library under Site Contents for the search center site. Select Files, New Document, and then Page. Note that the page layout is a Search Results page layout. choose a name and save. In the screenshot below I created a page called awresultpage.


Now we will edit the page to set our filter. Edit the page and choose edit the webpart for the Search results webpart. in the "Properties for Search Results" section, select change query.


 For "Select a query" choose the result source. In this case it would be the AWresultSource we created earlier. This will set the filter on the results we want. Again I should see a search result preview. Note that I could have set the result source filter right here instead of at the service application level. You have lots of options for the visibility level for returning a subset of the crawled index.


The last thing I need to do is to modify the Search Settings page under site settings to show the menu item on the search page. Here I will add a link under Configure Search Navigation.


 The link points to the results page I created.


Now when I go to the search page, I see products as a menu option. and when I click it, I see the results for the content source.


Wednesday, April 17, 2013

Configuring Search in SharePoint 2010

In this article I am describing how to configure Search in SharePoint 2010.

1. Go to SharePoint Central Administration.

2. Click on Application management then select Manage Service application.
 

ConSerShare1.gif

3. Click New and select Search Service Application
 

ConSerShare2.gif

4. Give a name for your Service application.

5. Select Search Service account or register new Service account in the drop down.

6. Better create a new application pool for your Search service as shown below.
 

ConSerShare3.gif

7. Once done Click OK.
 

ConSerShare4.gif

8. It will take some time to configure the service.

9. Once configured correctly you will see the service created like below.
 

ConSerShare4.1.gif

10. Click on the Search Service Application 1 that we create now.

11. Select Content Source. 

ConSerShare5.gif

12. Click on the Local SharePoint Site.
 

ConSerShare6.gif

13. Add the Web applications that you need to put in Search Services as shown below.
 

ConSerShare7.gif

14. You have to configure Full and incremental crawl schedules in the preceding screen.

15. Now go back and start a Full crawl.
 

ConSerShare8.gif

16. You will get the following screen.
 

ConSerShare9.gif

17. Even though you have done all these steps you may get some error while searching "The search request was unable to connect to the Search Service".

18. To avoid this you have to perform the following steps.

19. Go to Application management and select Configure Application Association as shown below.
 

ConSerShare10.gif

20. Click on your application.

21. From the "Edit the following group of connections" drop down select Custom.

22. Associate your search service with your web application.

ConSerShare11.gif

23. If you done this step you may have to start the crawl once again.