How to add the infopath form with Unique name so that the new forms will get saved with the unique name. So I am going to explain
the steps in detail with screenshots.
- Create RetrieveIDs data connection
- Create hidden fields for storing the ID and Filename
- Create a Submit data connection for your that uses Filename field for submit filename
- Disable toolbar options
- Create custom button with 5 rules
Create RetrieveIDs data connection
Create a RECEIVE data connection in your form template that connects to
the Form Library where the form resides. Unless you want other
metadata from this library, only select the ID field when configuring
the DC. On the last page, make sure to deselect the checkbox for
“Automatically retrieve data when form is opened.” We want to retrieve
the data at the exact moment before submitting the form just in case
someone else has submitted a form while our form was open (Fig 1).

Fig 1 – Data connection to retrieve IDs from the SharePoint List
Create hidden fields for storing the ID and Filename Create a numID field (Whole Number) and strFilename
field (Text). Do not set any conditional formatting, rules, or data
validation on these. Add them to the canvas for now and make them
read-only (Fig 2). These will be visible for testing purposes only.

Create a Submit data connection that uses the strFilename field for dynamically creating the filename
Create a SUBMIT data connection in your form template that connects to
the Form Library where the form resides. Put in the URL of your Form
Library for the “Document Library” field, and choose the strFilename data element for “File name” field by using the fx button. Check the box for “Allow overwrite if file exists” (Fig 3).

Fig 3 – Creating the Submit data connection for the Form Library
Disable toolbar options
Click Tools > Form Options > Browser. Uncheck Save, and Save As
(Fig 4). Submit should be grayed since it has not been configured. If
it has been configured, be sure it is unchecked. Update should be
unchecked by default, so leave it. I personally uncheck “Views,” since I
use views to dynamically route people to certain information based off
their identity or the form’s workflow status, but it’s up to you. If
your form is not browser-enabled, use the Open and Save menu in Form
Options to uncheck Save and Save As.

Fig 4–Disabling toolbar functions for Browser-Enabled Forms
Create custom button with 5 rules

Fig 5 – The full view of the 5 Rules
-
1) Query the RetrieveIDs data connection (Fig 6)

2) Set numID to the the next incremental ID only with two conditions – there is at least one form already existing in the library and only if the current form has not already been submitted (Fig 7)
- Set a condition rule to have two conditions
- For the first, click “Select a field or group,” select the RetrieveIDsdata source from the top pulldown, drill down to the IDdata element, and choose “Number of occurrences of ID” in the bottom pulldown. Select the operand “is greater than” and type the number 0 in the last box.
- For the second condition, simply choose strFilename in the first pulldown and set the operand to “is blank.”

Fig 7 – Setting the incremental ID with conditions
- Create one action that sets numID to the next number higher than the highest ID in the form library (Fig 8). For the Action, choose “Set a field’s value.” For the Field, choose numID. For Value, click the fx button and put in the formula max(@ID) + 1(do not copy and paste this – you must use the Insert Function and Insert Field buttons to make sure it resolves properly. You can also copy this Xpath string: xdMath:Max(xdXDocument:GetDOM(“RetrieveIDs”)/dfs:myFields/dfs:dataFields/dfs:AutoNumbering/@ID) + 1

Fig 8 – Setting the ID to the next incremental value
What we are accomplishing here is that we are giving our current form the next ID
in line before submitting the form. We are making sure this rule only
runs when the library is not empty, because it would cause an error when
there is no ID to use for the max(ID) function. Also, we are only setting this value when the form is brand new, which means it has no strFilename yet. We have to do this so that if the form is edited, there will be no change to the numID field. We only want this rule to run when the library is not empty and when the form is brand new.
3) Set numID to 1 upon the single condition that the form library is empty (Fig 9).
- Set a condition rule to have one condition. Click “Select a field or group,” select the RetrieveIDsdata source from the top pulldown, drill down to the IDdata element, and choose “Number of occurrences of ID” in the bottom pulldown. Select the operand “is equal to” and type the number 0 in the last box.
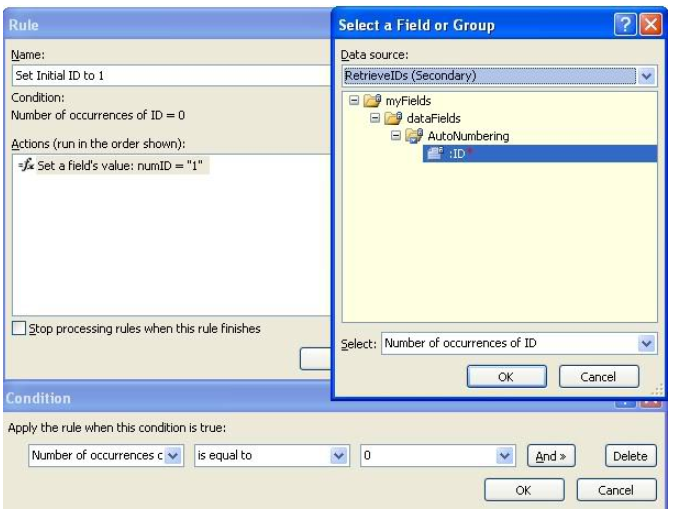
Fig 9 – Setting the Initial ID with a condition
- Create one action that sets numID to 1 (Fig 10)

Fig 10 – Setting the ID to 1 for the first form in the library
What we are accomplishing here is that we are giving our form the first ID of “1” due to the fact that it is the first form to be submitted to the library. This is only possible when the form is brand new, so there is no need to add a condition related to the strFilename. All we need to do is check to see if the form library is empty. This step circumvents the NaN error when using max(ID) and getting a null value back. Also, notice that this rule is put in line AFTER the Set Next ID step above. The reason for this is because both rules would run if they were in the opposite order, and you’d be skipping IDs.
4) Edit the existing form without changing numID or strFilename, then close it (Fig 11).
- Set a condition rule to have one condition stating that strFilename is not blank.
-
Add two actions in this order:
- Submit to your SharePoint Library Submit data connection
- Close

Here, we are simply submitting the form back to the library in a manner that will not change any metadata and will overwrite the existing file of the same name. This is the whole reason for the strFilename field. We do not want the strFilename to be recreated each time the form is edited. This rule is placed before the Submit rule for the same reason as stated above. We need to check first to see if the form has already been submitted. If so, then we submit using the current strFilename. If not, then we skip this rule.
- Set a condition rule to have one condition stating that strFilename is blank.
-
Add three actions in this order:
- Set the Value of strFilename (Fig 12) to the concatenated string combining userName() with the numID field. The formula is concat(userName(), numID). The Xpath is concat(xdUser:get-UserName(), my:numID).
- Submit to your SharePoint Library Submit data connection
- Close

Fig 12 – Setting the dynamic filename prior to submission
Here, we are submitting the form to the form library for the first time. This is why we first dynamically create the strFilename, because the Submit data connection uses this field to create the filename in SharePoint. We only want to do this step upon first submission, so that is why this rule only runs if the strFilename is blank. Doing this rule last keeps us from double-submitting, because the Edit rule would run right after the Submit rule due to its condition being met (strFilename is not blank). You can of course choose any concatenation formula you want, or you can use no formula and simply use the numID value – this part is up to you. After publishing the form template, go to your library, which should be empty with no files ever having been submitted (Fig 13), otherwise the ID of the actual files in the library won’t start with 1, and the InfoPath numID won’t match the SharePoint ID.

Fig 13 – In your new Form Library with no history of records, click New
The new, blank form should look like this (Fig 14):

Click Submit, and you should be returned to the library showing just one file (Fig 15), and it should have the Name of username1 (i.e. ccobb1).

Click on that file to re-open it, and it should show the populated fields with numID = 1 and strFilename = ccobb1 (Fig 16).

Click Submit again, and notice that you go back to the form library, but nothing has changed on the form except the Modified date/time stamp. The ID did not increment, and a new file was not created, because we were just editing the same file. Now, click New again, and submit. You should see a new file with a Name that is equivalent to ccobb2. Do this several times and edit some of those forms several times to ensure they all behave properly. There is one big problem with all of this, though, and I’ll demonstrate it for you. This entire concept works well UNLESS all the forms get deleted so that there are no forms remaining. If you do that, then the next form you create will be given the numID of 1 and the strFilename of ccobb1. However, in SharePoint, the ID will be the next highest ID in succession after the highest ID that had been created and subsequently deleted. Deleting files in a SharePoint list does not re-start the ID increment, so keep that in mind. If you delete all but one of your forms, then the numID solution we have here continues to work. Here is an pic showing what happens if you delete all but one of the forms and then create a new one (Fig 17).

Three other major concerns are the scalability issue, the View settings issue, and the heavy use issue.
- Scalability – The data connection is pulling down the ID of every form in the main view of your form library. What if you have hundreds or thousands of forms? You will be pulling down tons of info that will slow the form load when all you need is a single piece of info – the highest ID in the list. A potential workaround for this is to create a custom view that is set to Sort by Created in Descending Order with a finite Item Limit of 1 (Fig 18). This always show only ONE item, and that will be the item with the highest ID in the entire list, because IDs are assigned upon creation of the file, so the most recently created file will have the highest ID. The problem then becomes that you need to create a data connection directly to this view instead of the library itself (DCs to SP lists use the default view). To do this, you must create an XML data connection pointing to the XML view of that SP view by using this write-up: Populating Form Data from SharePoint List Views. Believe me, this works, and I use it all the time, but I can imagine if it seems daunting to people who are just trying to figure out the entire solution above. To be clear, this DC would replace your RetrieveIDs DC from step 1.

Fig 18 – View Settings for showing only the list item with the highest ID#
- View Settings – Similar to the above issue, the Max(ID) function is only going to return the highest ID that InfoPath sees in the default view. The default view settings for a form library are to limit the items to 100. Also, any filtering on the default view would potentially cause InfoPath not to see every ID. You either have to make sure your default view has EVERY list item visible with no Item limit, or you need to use the above alternative view that shows only the highest ID form.
- Heavy Use – By heavy use, I mean that new forms are being created very frequently – enough that there is the potential for multiple people to submit new forms within the same moments (the window of time depends on the speed of the system), because this method relies on being able to read the items in the library to get the current Max(ID). If both get submitted close enough together, there is a chance that they assign themselves the same ID or that the submit fails altogether. It’s best to submit the doc, retrieve the ID after submission, then submit again (all in one button push), but this only works if you don’t need the ID itself in the filename.


